1 Thread Safety
Stateless objects are always thread safe.
1.1 Atomicity
1.1.1 Race Condition
Reaching the desired outcome depends on the relative timing of events.
Compound Actions:
- check then act (lazy initialization)
- read modify write (increment i++)
需要使得两个线程有序执行
Sequences of operations that must be executed atomically in order to remain thread safe
Atomic类实现了原子化操作, 可以避免 Race Condition 她是无锁的, 而是用的CAS, Compare and Swap. 性能上比 synchronized 关键字要好, 我在 这里 写了Race Condition的例子, 分别用atomic 和 synchronized 避免了 Race Condition 的问题.
1.1.2 Java Atomic Package
关键词:
- CAS (cmpxchg instruction)
- SpinLock
问题:
- ABA
- 循环时间长
参考: 聊聊并发(五)原子操作的实现原理
2 Locking
2.1 Thread State
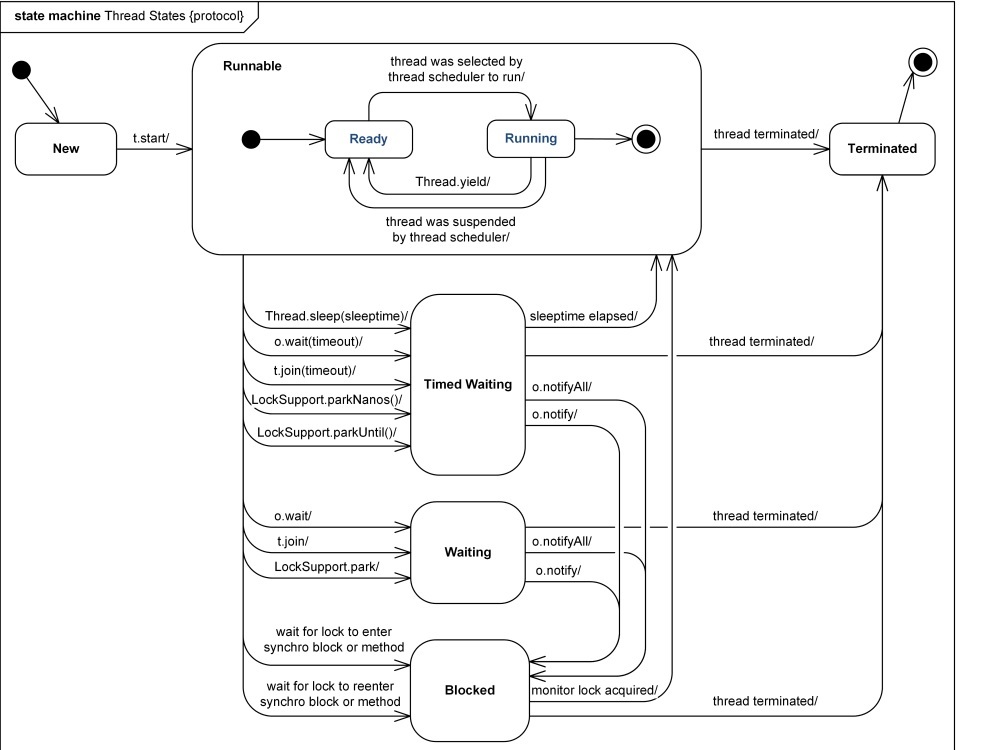
6个状态, 下面是从JDK8.0中摘抄的注释部分:
- NEW not yet started
- RUNNABLE executing in the Java virtual machine
- BLOCKED waiting for a monitor lock.
- WAITING called by
Object#wait(),Thread#join()orLockSupport#park() - TIMED_WAITING WAITING with timeout, called by
Thread#sleep(),Object#wait(),Thread#join(),LockSupport.parkNanosorLockSupport.parkUntil - TERMINATED termiated
其中 BLOCKED 和 WAITING 的区别为:
BLOCKED 是在等待排他锁, 而 WAITING 是被调用了 `Object#wait()`, `Thread#join()` or `LockSupport#park()` 方法,
而处于等待状态, 并且可以通过 `notify` 或者 `notifyAll` 方法进行唤醒.
2.2 线程通信 Cooperate
为什么需要有 WAITING 状态, 是为了进行线程间的通信
2.2.1 Share Objects
线程/进程可以通过共享内存的某个值进行通信. 通过不停地轮询某个值, 来判断是否要进行处理某个业务逻辑. 伪代码如下
while (!needHandle) {
    // doNothing
}

doThing
上面的方式会一直占有着CPU的时钟, 当会导致CPU的利用率很低
2.2.2 Wait Notify and NotifyAll
wait, notify 和 notifyAll 为 Object 的方法, 故他们可以作用在所有的对象上.
wait方法会使得线程放弃CPU的控制权, 直到他被notify
注意一点, 这三个方法必须在 synchronized 里面使用, 否则会抛出 IllegalMonitorStateException 异常
为什么需要在 synchronized 里面使用? 在 这篇文章 和 Stack Overflow 中都有解释. 个人认为主要是因为: Lost Wakeup Problem. 添加 synchronized 并不能解决该问题, 但是能降低问题出现的概率.
2.3 Monitor
在JVM内部, synchronized 是用 monitor 的概念实现的. Java 的 Monitor 实现了两种类型的 thread synchronized, mutual exclusion 和 cooperation, 即排他性 和 协作性.
synchronized { // monitor region begin, 即 monitorenter
    doThingA;
    ...
}              // monitor region end, 即 monitorexit
Monitor的模型如下图所示
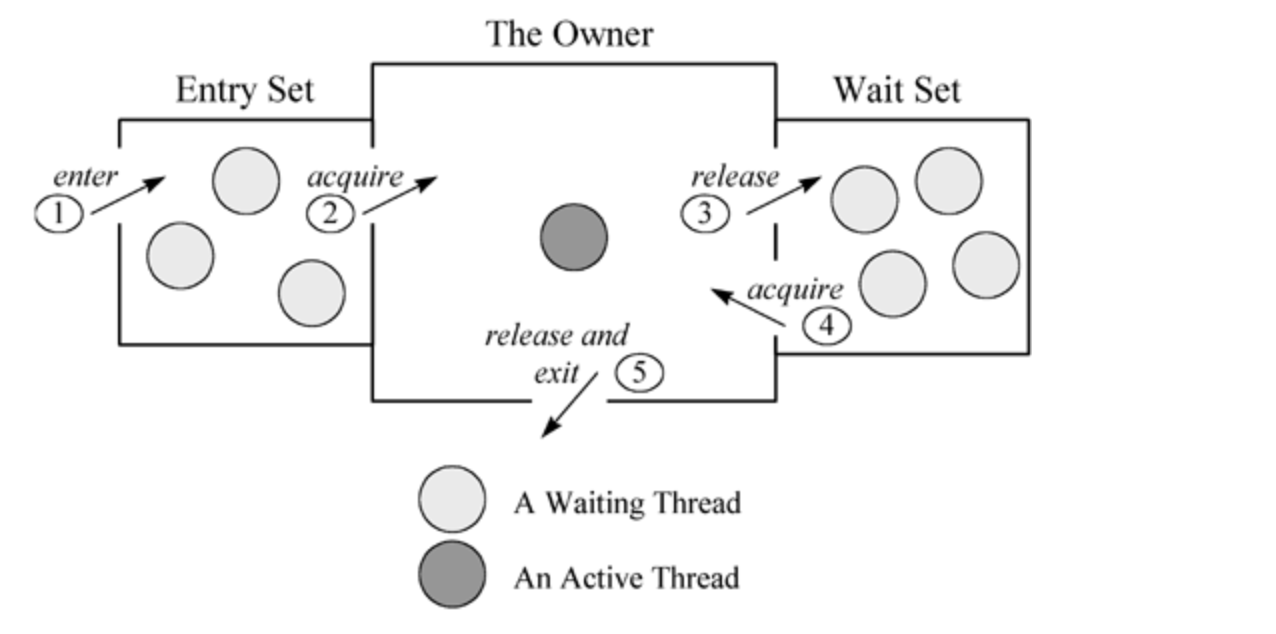
- Entry Set: 所有等待锁的线程集合
- The Owner: 获得到锁的线程
- Wait Set: 处于 WAITING 状态的线程
一个线程获取锁的步骤如下:
上面的步骤也说明了: 一个线程如果要变成 WAITING (Object#wait, 不考虑sleep的情况) 状态, 必须要先进入
The Owner区域获取到锁, 再通过wait方法将锁释放进入Wait Set. 而 Object#wait 本身的定义是: 释放锁.
等待被notify, 那么在释放锁之前, 必须要先获得锁. 同样, Object#notify 的定义为: 通知Wait Set去获取锁,
那么在notify之前也必须要获得锁, 才能释放给Wait Set.
2.4 Reentrancy
如果是嵌套的 synchronized , 如下所示:
synchronized(this) {
    doSthA

    synchronized(this) {
        doSthA
    }
}
Java的锁设计成是可以重复进入的. 线程每次进入一个锁区域的时候 +1, 退出的时候 -1, 如果变为0, 线程则会释放锁
锁的时间尽量短而小, 不然会导致性能比较差
3 Sharing Objects
4 Thread Pool
4.1 Task Execution
-
Serial
单线程: 无法提高 Throughput, 响应缓慢
-
Threads Without Limits
线程的创建和销毁有开销 线程会占用内存 线程会占用文件资源(File Descriptor)
无限制的创建线程容易导致CPU负载过高, 内存泄漏等
-
Thread With Limits
使用线程池, 预先生成线程, 线程个数有限, 可控制资源的占用情况
线程池的使用: 示例源码
public class ThreadPool {
    private static final int THREAD_COUNT = 100;
    private static final Executor executor = Executors.newFixedThreadPool(THREAD_COUNT);
    public static void runMuiltThreadServerWithThreadPool() throws IOException {
        ServerSocket socket = new ServerSocket(10080);

        while (true) {
            final Socket connection = socket.accept();
            // 这里采用了线程池的方式
            executor.execute(() -> handleConnection(connection));
        }
    }
}
4.2 源码分析
线程池简而言之是: 创建了多个线程, 来并行地处理一些任务, 任务可以并发地进行, 进程的数目, 存活状态都由线程池来管理和维护
在 Java Concurrency in Practice 一书中, 提到了 Execution Policities, 包括下面几点
- What Thread tasks will be executed
- What Order tasks will be executed(FIFO, LIFP, priority order)
- How Many tasks execute concurrently
- How Many tasks be queued pengding
- Which Task should be selected as a victim when system is overloaded and how the app be notified
- What actions should be taken before/after executing a task
使用线程池会带来很多新的问题, 如上所述. 所以说线程池其实是一种 Resouces Mangement Tool
4.2.1 Executors
在 concurrency 包中, 实现了下面的几种 Executor
- newFixedThreadPool
- newCachedThreadPool
- newSingleThreadExecutor
- newScheduledThreadPool
直观上理解为: thread数目固定, thread数目不固定, thread数目为1 和 定时thread 四种. 除了上述四种, 还有 newWorkStealingPool 和 unconfigurableExecutorService等
4.2.2 newFixedThreadPool
在 示例代码 中使用了固定线程的线程池.
public class ThreadPool {
    private static final int THREAD_COUNT = 100;
    private static final Executor executor = Executors.newFixedThreadPool(THREAD_COUNT);

    public static void runMuiltThreadServerWithThreadPool() throws IOException {
        ServerSocket socket = new ServerSocket(10080);

        while (true) {
            final Socket connection = socket.accept();
            // 这里采用了线程池的方式
            executor.execute(() -> handleConnection(connection));
        }
    }
}
在上述示例中, 设置的 THREAD_COUNT = 100, 该线程池包含下面的部分:
4.2.3 ctl, Thread Pool Status and Worker Count
线程池的状态 有下面几种, 下面的内容摘抄自 JDK8.0
The runState provides the main lifecycle control, taking on values:
The numerical order among these values matters, to allow ordered comparisons. The runState monotonically increases over time, but need not hit each state.
The transitions are:
 RUNNING -> SHUTDOWN
    On invocation of shutdown(), perhaps implicitly in finalize()
 (RUNNING or SHUTDOWN) -> STOP
    On invocation of shutdownNow()
 SHUTDOWN -> TIDYING
    When both queue and pool are empty
 STOP -> TIDYING
    When pool is empty
 TIDYING -> TERMINATED
    When the terminated() hook method has completed
部分状态的源码如下:
// 状态信息存储在第30位-第32位
int COUNT_BITS = Integer.SIZE - 3, // 29位
        CAPACITY = (1 << count_bits) - 1;

        int RUNNING = -1 << COUNT_BITS,       // 11100000000000000000000000000000 -536870912
                SHUTDOWN = 0,
                STOP = 1 << COUNT_BITS,       // 00100000000000000000000000000000 536870912
                TIDYING = 2 << COUNT_BITS,    // 01000000000000000000000000000000 1073741824
                TERMINATED = 3 << COUNT_BITS; // 01100000000000000000000000000000 1610612736
-1在计算机中如何表示? 在这里是使用的是 Two's Complement, 在 这篇文章 给出有趣的例子和证明. 假设现在有一个数 a, 则 -a = ~a + 1, 也就是取 a 的反码再加 1. 则 (假设是32位) -1 = ~00000000000000000000000000000001 + 1 = 11111111111111111111111111111110 + 1 = 11111111111111111111111111111111, 上述中的 running 变量为 11111111111111111111111111111111 << 29, 左移 29 位为: 11100000000000000000000000000000.
在 ThreadPoolExecutor 中, 非常重要的一个参数为 ctl, 在 JDK8.0 解释如下
The main pool control state, ctl, is an atomic integer packing two conceptual fields. workerCount, indicating the effective number of threads runState, indicating whether running, shutting down etc
故从ctl中可以通过一些方法获取到 workerCount 和 runState 的信息, 而ctl的计算也将包括
workerCount 和 runState 的信息.
源码如下:
// assertThat(Integeer.toBinaryString(CAPACITY), is("11111111111111111111111111111"));
// assertThat(Integer.toBinaryString(CAPACITY).length(), is(29));

// ctl 包含两部分: runState 为 第30位 至 第32位, workerCount 为 第1位 到 第29位
// 故获取 runState 只需要高位(30-32)信息 为 ctl & ~CAPACITY
// 故获取 workerCount 只需要低位(1-29)信息 为 ctl & CAPACITY

// 这里的 c 为 ctl, 该方法从 ctl 解析出当前的状态, 如 running/shutdown等
private static int runStateOf(int c)     { return c & ~CAPACITY; }

// 这里的 c 为 ctl, 该方法从 ctl 解析出当前的workerCount
private static int workerCountOf(int c)  { return c & CAPACITY; }

// rs 代表 runState, 如上所述的 running/shutdown/stop/tidying/termiated 等值
// wc 代表 workerCount
// 通过 rs 和 wc 得到 ctl 的值
private static int ctlOf(int rs, int wc) { return rs | wc; }
ctl 的生成, 源码中称为 pack, ctl 的解析, 称为 unpack.
思考: 为什么要有一个 ctl 这种值? 引入了 ctl 这个概念? 引入新概念的成本非常高, 而且也需要pack/unpack. 我的理解是如果直接使用 runState 和 workerCount, 那么他需要添加 synchronized 进行控制, 而不是简单地使得 runState 和 workerCount 变为 AtomicInteger, 而真实 的场景中, 这两个值是相互影响的, 与其每次都得添加 synchronized, 不如将这两个值绑定在一起.
// 初始化值为 11100000000000000000000000000000 -536870912, 即 -2^29
private final AtomicInteger ctl = new AtomicInteger(ctlOf(RUNNING, 0));
// rs 代表 runState, 如上所述的 running/shutdown/stop/tidying/termiated 等值
// wc 代表 workerCount
private static int ctlOf(int rs, int wc) { return rs | wc; }
知道了 workerCount 和 runState 的计算和原子性设计之后, 便可知道基本的流程如下
4.2.4 addWorker
当发现队列的容量未满, 而且Pool的状态不是 SHUTDOWN 或者 STOP,
则可进行 addWorker 操作
addWorker主要做下面几件事
- 检查状态
- 生成一个 Worker, 添加至
HashSet<E> workers中 - 调用 worker.thread.start() 方法
我在阅读代码的时候, 看到存在 workers 和 workQueue 这两个field
/**
 * Set containing all worker threads in pool. Accessed only when
 * holding mainLock.
 */
private final HashSet<Worker> workers = new HashSet<Worker>();

/**
 * The queue used for holding tasks and handing off to worker
 * threads.  We do not require that workQueue.poll() returning
 * null necessarily means that workQueue.isEmpty(), so rely
 * solely on isEmpty to see if the queue is empty (which we must
 * do for example when deciding whether to transition from
 * SHUTDOWN to TIDYING).  This accommodates special-purpose
 * queues such as DelayQueues for which poll() is allowed to
 * return null even if it may later return non-null when delays
 * expire.
 */
private final BlockingQueue<Runnable> workQueue;
当时非常难理解, 为什么需要两个类似的东西? 后来才明白, worker 是指 执行命令的线程载体, 它可以看做一个 Thread Wrapper, 不停地去轮询有没有任务(task)需要去执行; workQueue 是指所有task的集合, 他是一个阻塞队列.
两者的交互方式为:
workerCount 代表的是 当前执行命令(task)的线程的个数, corePoolSize 代表的是 可生成的执行命令(task)的线程的总数
4.2.4.1 get task
在 Worker#runWorker 方法:
final void runWorker(Worker w) {
    Thread wt = Thread.currentThread();
    Runnable task = w.firstTask;
    w.firstTask = null;
    w.unlock(); // allow interrupts
    boolean completedAbruptly = true;
    try {
        // 不停地获取任务, 直到没有任务可以获取
        while (task != null || (task = getTask()) != null) {
            ...
            task.run();
            ...
        }
    }
}
有一个 getTask 方法, 这个方法会去 workQueue 里面去数据
private Runnable getTask() {
    ...
    try {
        Runnable r = timed ?
            // 如果设置了超时, 就使用 poll 方法获取 task
            workQueue.poll(keepAliveTime, TimeUnit.NANOSECONDS) :
            // 如果没有设置超时, 就使用 take 方法获取 task
            workQueue.take();
        if (r != null)
            return r;
    } catch (InterruptedException retry) {
        ...
    }
}
对于 newFixedThreadPool 这种类型, 使用的是 LinkedBlockingQueue, 在poll的时候会添加takeLock, offer的时候会添加putLock.
4.2.4.2 Worker Data Structure
在上文中提到的 workerCount 对应的 Worker 就是这个.
private final class Worker
    extends AbstractQueuedSynchronizer
    // 这个Worker 实现了 Runnable 接口!
    implements Runnable {

    // 这个线程是用来执行任务的
    final Thread thread;

    public void run() {
        runWorker(this);
    }
}
这里非常关键的有下面几点
- Worker 对应一个线程, 从而 workerCount 数目即是 thread 的数量
-
Worker 实现了
Runnable接口, 故实现了run方法private final class Worker // 这个Worker 实现了 Runnable 接口! implements Runnable { public void run() { runWorker(this); } } -
Worker 对应的 thread, 在 Worker 被实例化的时候, 将它本身传给了 thread
private final class Worker
    // 这个Worker 实现了 Runnable 接口!
    implements Runnable {
    /**
     * Creates with given first task and thread from ThreadFactory.
     * @param firstTask the first task (null if none)
     */
    Worker(Runnable firstTask) {
        setState(-1); // inhibit interrupts until runWorker
        this.firstTask = firstTask;
        // thread创建的时候, 已经将当前的worker: this传入了
        this.thread = getThreadFactory().newThread(this);
    }
}
在 调用
worker.thread.start()的时候, 将会执行Worker#run方法 -
Worker 状态的控制是在
Worker#run方法中做的当时我一直在想一个问题: worker线程挂了怎么办? 谁来做处理? 原本想的是
线程池有一个单独的线程, 轮询其他线程的状态, 但是 这个线程挂了 怎么办? 查看源码后知道, 其实是在每一个 worker 自己去管理的, 在run方法的时候会设置 workers. 设置的时候会添加mainLockaddWorker:
    // this 为 ThreadPoolExecutor 对象
    final ReentrantLock mainLock = this.mainLock;
    mainLock.lock();
    try {
        int rs = runStateOf(ctl.get());

        if (rs < SHUTDOWN ||
            (rs == SHUTDOWN && firstTask == null)) {

            ...

            workers.add(w);
        }
    } finally {
        mainLock.unlock();
    }
processWorkerExit:
// worker 退出的时候会调用该方法
private void processWorkerExit(Worker w, boolean completedAbruptly) {
    if (completedAbruptly) // If abrupt, then workerCount wasn't adjusted
        // workerCount 的设置是原子性的
        decrementWorkerCount();

        final ReentrantLock mainLock = this.mainLock;
        mainLock.lock();
        try {
            ...
            workers.remove(w);
        } finally {
            mainLock.unlock();
        }
    }
看到这里兴奋无比, Sidekiq 也是用的多线程, 实现了类似的线程池的功能, 思路是完全一致的. 下面的代码摘抄于 Sidekiq::Processor#run. 在下面的 processor_stopped, processor_died 方法中, 也都是添加了锁.
# @mgr 即为他对应的 Manager 对象
class Processor
  def run
    begin
      while !@done
        # 调用 perform 方法进行处理
        process_one
      end

      # 一旦结束了, 则将 Processor对象中的manager对应的worker去掉, 即是改变了上述 Manager的 @workers 数组
      @mgr.processor_stopped(self)
    rescue Sidekiq::Shutdown
      # 在接收到TERM SIGNAL之后, 等待超时的时候sidekiq会抛出异常 Sidekiq::Shutdown, 见下文分析
      # 线程被关闭.
      @mgr.processor_stopped(self)
    rescue Exception => ex
      # 程序报错了, Manager#processor_died 会重新生成一个新的Processor线程
      @mgr.processor_died(self, ex)
    end
  end
end
4.2.5 LinkedBlockingQueue
Fixed Thread Pool, 使用的是 LinkedBlockingQueue 作为存储队列
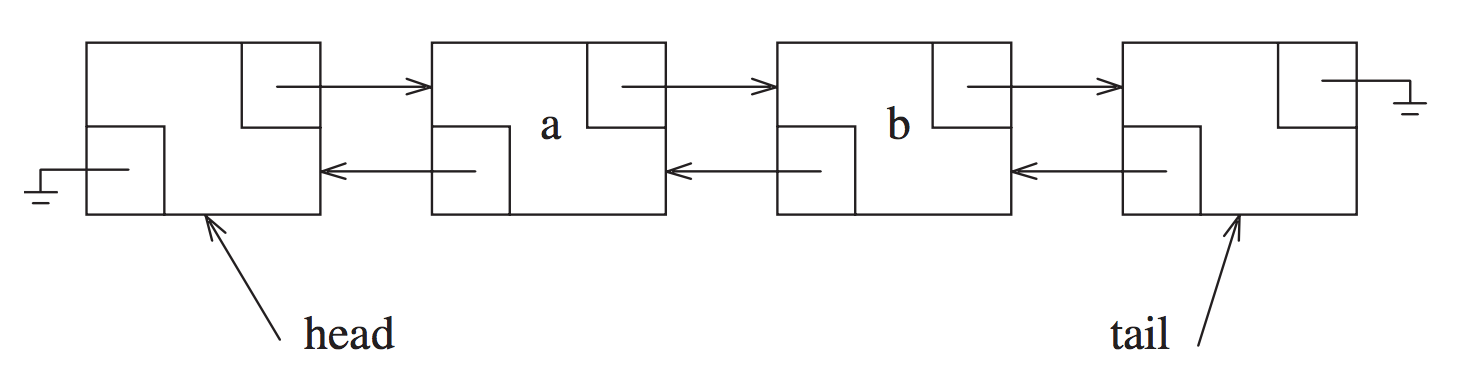
队列的特性主要有下面几点
-
FIFO,
offer操作发生在headNode,pool操作发生在lastNodepublic class LinkedBlockingQueue<E> extends AbstractQueue<E> implements BlockingQueue<E>, java.io.Serializable { /** * Head of linked list. * Invariant: head.item == null */ transient Node<E> head; /** * Tail of linked list. * Invariant: last.next == null */ private transient Node<E> last; }add/remove往队列里面插入/删除一条记录, 成功返回true, 插入/删除不成功将会报错;offer/pool往队列里面插入/删除一条记录, 成功返回true, 插入/删除不成功将返回false -
Two Lock Queue.
设计了
putLock和takeLock, 在offer之前需要获取 putLock, 在pool之前需要获取 takeLock.public class LinkedBlockingQueue<E> extends AbstractQueue<E> implements BlockingQueue<E>, java.io.Serializable { /** Lock held by take, poll, etc */ private final ReentrantLock takeLock = new ReentrantLock(); /** Lock held by put, offer, etc */ private final ReentrantLock putLock = new ReentrantLock(); } -
Signals
当队列变成非空的时候, 会通过 notEmpty.signal() 来进行通知
当队列变成未满的时候, 会通过 notFull.signal() 来进行通知
public class LinkedBlockingQueue<E> extends AbstractQueue<E>
    implements BlockingQueue<E>, java.io.Serializable {

    /** Wait queue for waiting takes */
    private final Condition notEmpty = takeLock.newCondition();

    /** Wait queue for waiting puts */
    private final Condition notFull = putLock.newCondition();
}
这种通知机制类似于
synchronized的wait和notify. 具体的场景为(以notFull为例): 当队列已满, 说明队列无法在offer新数据了 根据策略, 可以等待一段时间 notFull.awaitNanos// 队列当前长度 等于 队列的容量 while (count.get() == capacity) { if (nanos <= 0) return false; nanos = notFull.awaitNanos(nanos); }当队列未满时, 需要进行通知, 也就是
signal// 队列当前长度 小于 队列的容量 if (c + 1 < capacity) { notFull.signal(); } -
Queue Atomic Count. 队列长度为AtomicInteger对象
public class LinkedBlockingQueue<E> extends AbstractQueue<E> implements BlockingQueue<E>, java.io.Serializable { /** Current number of elements */ private final AtomicInteger count = new AtomicInteger(); } -
Node
. 使用节点来存储数据 public class LinkedBlockingQueue<E> extends AbstractQueue<E> implements BlockingQueue<E>, java.io.Serializable { /** * Linked list node class */ static class Node<E> { E item; /** * One of: * - the real successor Node * - this Node, meaning the successor is head.next * - null, meaning there is no successor (this is the last node) */ Node<E> next; Node(E x) { item = x; } } }
4.2.5.1 offer
LinkedBlockingQueue#offer 提供的是插入数据的方法
JDK8.0的注释如下:
Inserts the specified element at the tail of this queue, waiting if necessary up to the specified wait time for space to become available.
public class LinkedBlockingQueue<E> extends AbstractQueue<E>
    implements BlockingQueue<E>, java.io.Serializable {

    public boolean offer(E e, long timeout, TimeUnit unit)
        throws InterruptedException {

        if (e == null) throw new NullPointerException();
        long nanos = unit.toNanos(timeout);

        // Note: convention in all put/take/etc is to preset local var
        // holding count negative to indicate failure unless set.
        // 这个是约定, 设置为一个负值, 并没有特殊的含义...
        int c = -1;
        final ReentrantLock putLock = this.putLock;
        final AtomicInteger count = this.count;

        // 添加 putLock 的锁
        putLock.lockInterruptibly();

        try {
            // 如果队列已经满了, 则进行等待一段时间
            // 直到队列的count小于capacity 为止
            while (count.get() == capacity) {
                if (nanos <= 0)
                    return false;
                nanos = notFull.awaitNanos(nanos);
            }

            // 进行入队列操作, 该操作是不添加锁的, 仅仅修改了 last
            // last = last.next = node;
            enqueue(new Node<E>(e));

            // 原子性的进行加1
            c = count.getAndIncrement();

            // 如果发现队列未满, 则发 notFull 的 signal
            // TODO: signal的信号机制, ReentrantLock 还需要再看一下
            if (c + 1 < capacity)
                notFull.signal();
        } finally {
            // 解锁
            putLock.unlock();
        }
        if (c == 0)
            signalNotEmpty();
        return true;
    }
}
4.2.5.2 poll
LinkedBlockingQueue#poll 提供的是获取数据的方法
public class LinkedBlockingQueue<E> extends AbstractQueue<E>
    implements BlockingQueue<E>, java.io.Serializable {
    public E poll(long timeout, TimeUnit unit) throws InterruptedException {
        E x = null;
        int c = -1;
        long nanos = unit.toNanos(timeout);
        final AtomicInteger count = this.count;
        final ReentrantLock takeLock = this.takeLock;

        // 添加 takeLock 锁
        takeLock.lockInterruptibly();
        try {
            while (count.get() == 0) {
                if (nanos <= 0)
                    return null;
                nanos = notEmpty.awaitNanos(nanos);
            }

            // 从队列头部获得数据
            x = dequeue();
            c = count.getAndDecrement();
            if (c > 1)
                notEmpty.signal();
        } finally {
            takeLock.unlock();
        }
        if (c == capacity)
            signalNotFull();
        return x;
    }
}
4.2.6 Shutdown
线程池的关闭
public void shutdown() {
    final ReentrantLock mainLock = this.mainLock;
    mainLock.lock();
    try {
        checkShutdownAccess();
        advanceRunState(SHUTDOWN);
        interruptIdleWorkers();
        onShutdown(); // hook for ScheduledThreadPoolExecutor
    } finally {
        mainLock.unlock();
    }
    tryTerminate();
}
包括下面四部分:
- checkShutdownAccess, 检查是否有权限操作该线程
- advanceRunState(SHUTDOWN), 将线程池设置为SHUTDOWN状态, 使用CAS设置.
-
interruptIdleWorkers, 将每一个没有处理任务的worker都中断
如何进行判断是否正在处理任务? 这里利用了
tryLock方法for (Worker w : workers) { Thread t = w.thread; // 如果没有中断, 而且可以获得锁 (如果获取不到锁, 则说明他正在处理任务) if (!t.isInterrupted() && w.tryLock()) { try { t.interrupt(); } catch (SecurityException ignore) { } finally { w.unlock(); } } }线程池用到的
Worker继承自AbstractQueuedSynchronizer, 里面实现了相关的synchronizers.tryLock为 AbstractQueuedSynchronizer 提供的基础功能之一. onShutdown, 给
ScheduledThreadPoolExecutor添加的钩子方法.
什么时候需要调用shutdown方法? 参考StackOverflow里的 这篇回答, 类似于 SIGINT 信号(如我们使用CTRL-C)停止使用, 或者直接发送一个信号给相应的进程等. 会用到 shutdown, 这里的 shutdown 是一种 gracefully shutdown, 首先停止接收新的请求, 然后关闭多余的worker, 再等待现有的任务执行完(可给一个处理超时时间). 这是一种非常经典的做法, Sidekiq 队列的重启也是这样处理的.
这里 停止接收新的任务 是通过设置状态为 SHUTDOWN 控制的, 作者还提供了 shutdownNow方法, 该方法清除还存留在队列里面的值.
4.2.7 Future
ExecutorService接口提供了 submit 方法, 她和 execute 的区别是 submit 返回 Future 对象, 我们可以通过 Future 对象来获得当前的任务的执行状态,
或者是获得执行的结果
while (true) {
    final Socket connection = socket.accept();
    Future task = executorFuture.submit(() -> handleConnection(connection));
    System.out.println(task.get());    // 如果没有结果则堵塞
    System.out.println(task.isDone()); // 返回true
}
4.2.7.1 Runnable Wrapper
Future的实现仅仅是一个Wrapper.
在调用
Future task = executorFuture.submit(() -> handleConnection(connection));
的时候, submit 方法源码如下:
// java/util/concurrent/AbstractExecutorService.java:114
public Future<?> submit(Runnable task) {
    if (task == null) throw new NullPointerException();
    RunnableFuture<Void> ftask = newTaskFor(task, null);
    execute(ftask);
    return ftask;
}
可以看到, 她其实是创建了一个 RunnableFuture 的对象, 这个对象实现了 Runnable 和 Future
并且将传入的真正的任务变成了 RunnableFuture 的一个 field
public FutureTask(Runnable runnable, V result) {
    // 将需要执行的任务存储起来
    this.callable = Executors.callable(runnable, result);
    this.state = NEW;       // ensure visibility of callable
}
然后线程池执行的execute方法, 会调用 FutureTask#run()
public class FutureTask<V> implements RunnableFuture<V> {
    public void run() {
        if (state != NEW ||
            !UNSAFE.compareAndSwapObject(this, runnerOffset,
                                         null, Thread.currentThread()))
            return;
        try {
            Callable<V> c = callable;
            if (c != null && state == NEW) {
                V result;
                boolean ran;
                try {
                    // 在这里调用真正的需要执行的任务
                    result = c.call();
                    // 到这儿就说明已经执行完了
                    ran = true;
                } catch (Throwable ex) {
                    result = null;
                    ran = false;
                    setException(ex);
                }
                if (ran)
                    set(result);
            }
        } finally {
            ....
        }
    }
}
4.2.7.2 Future#get()
FutureTask对象有一个状态字段:
/**
 * The run state of this task, initially NEW.  The run state
 * transitions to a terminal state only in methods set,
 * setException, and cancel.  During completion, state may take on
 * transient values of COMPLETING (while outcome is being set) or
 * INTERRUPTING (only while interrupting the runner to satisfy a
 * cancel(true)). Transitions from these intermediate to final
 * states use cheaper ordered/lazy writes because values are unique
 * and cannot be further modified.
 *
 * Possible state transitions:
 * NEW -> COMPLETING -> NORMAL
 * NEW -> COMPLETING -> EXCEPTIONAL
 * NEW -> CANCELLED
 * NEW -> INTERRUPTING -> INTERRUPTED
 */
private volatile int state;
private static final int NEW          = 0;
private static final int COMPLETING   = 1;
private static final int NORMAL       = 2;
private static final int EXCEPTIONAL  = 3;
private static final int CANCELLED    = 4;
private static final int INTERRUPTING = 5;
private static final int INTERRUPTED  = 6;
可以看到, 状态的变化是非常复杂的. 我原本想的是 Future#get() 方法很简单, 不就是一个轮询吗? 完成了就返回结果即可
但是其实如果不停的自旋等待(spin-wait), 会占有CPU资源, 所以这里做了很多优化, 如 Thread.yield() 等.
这块还用到了SynchronousQueue Phaser LockSupport Treiber等概念和相关知识, 需要恶补一下.
